概述
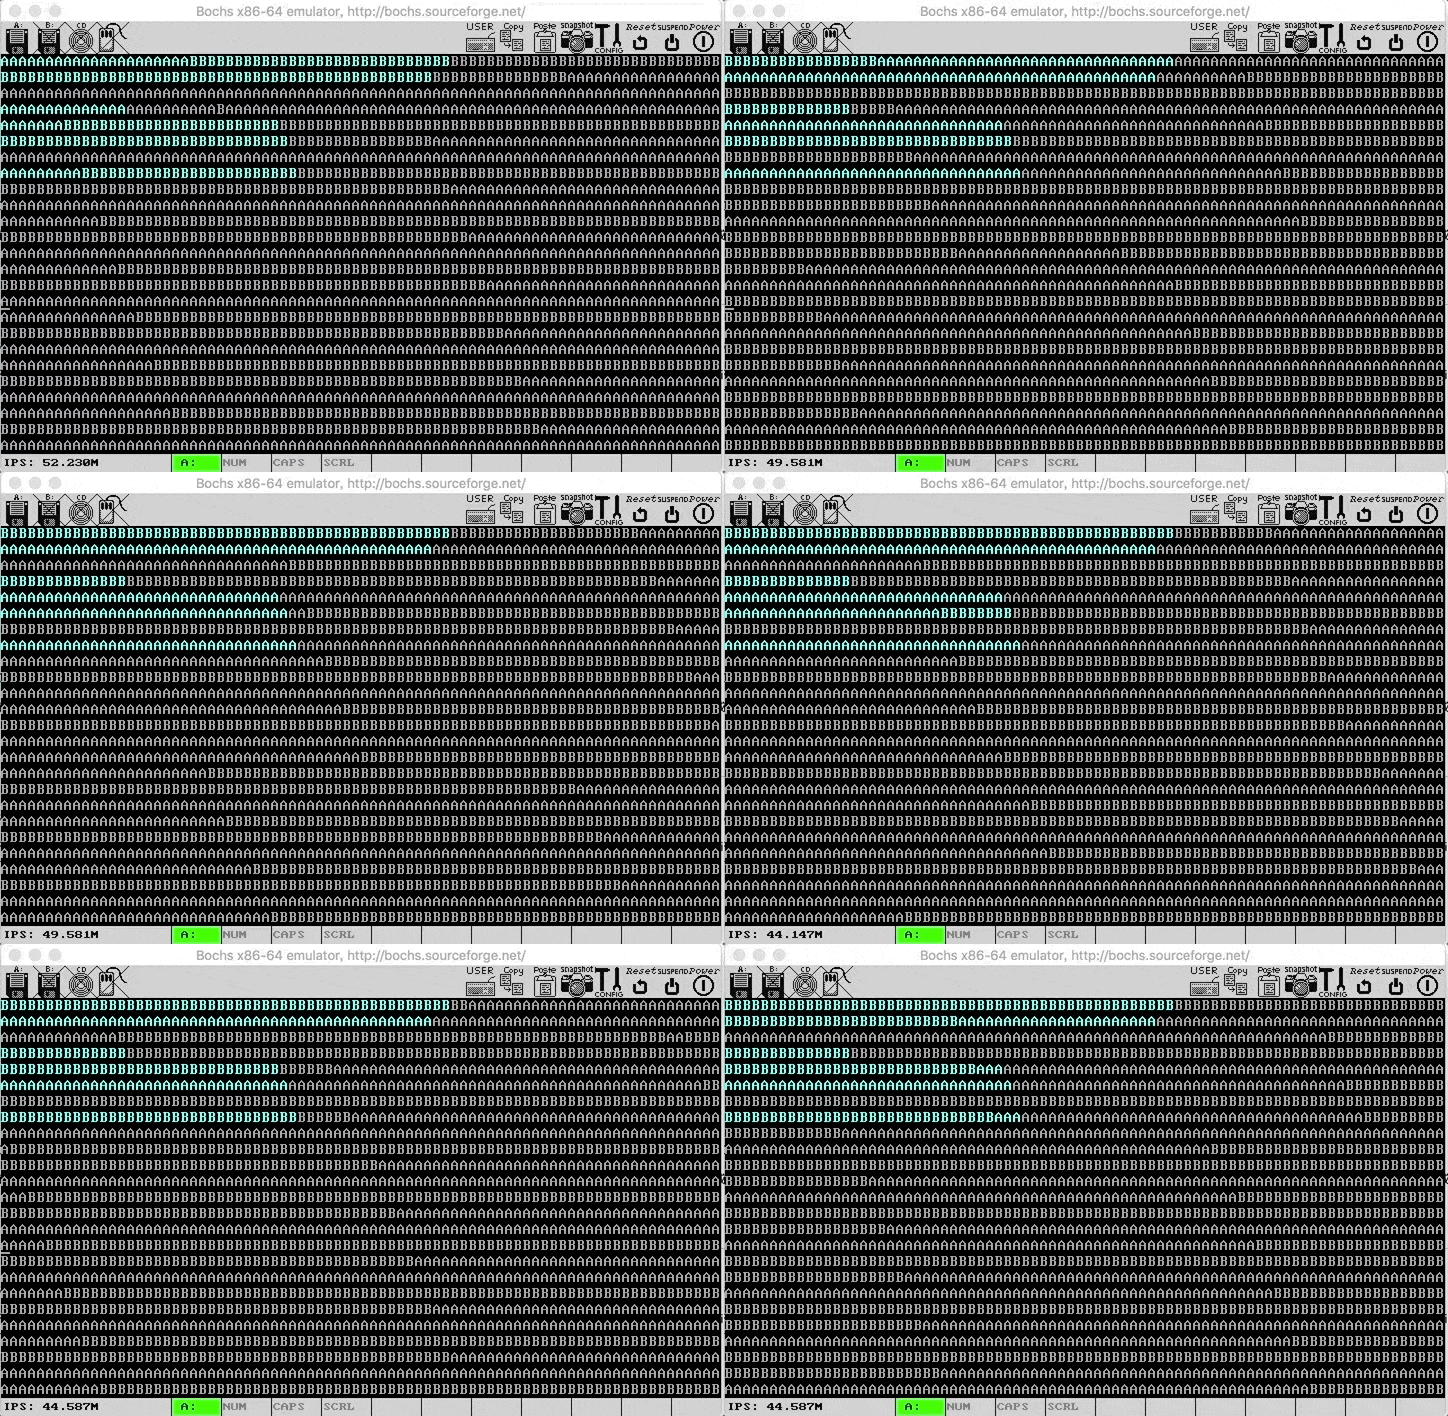
《只是为了好玩》一书中,林纳斯描述过他最早的试验性程序就是让 CPU 执行两个不同的任务(一个不断输出A,另一个输出B),同时不断地让 CPU 在两个任务间的切换。
结合《Linux 内核完全注释》一书,得到了多任务切换的示例程序。
本节所要描述的内容,正是结合一个框架式的汇编程序(多任务切换程序, 书中提供的内容比较老,无法适应目前的各种工具、环境),在现有环境中加以处理并成功运行。
关于运行环境的说明,欢迎参考 理解 Linux Kernel (0)
引导程序
在 理解 Linux Kernel (1) 已经描述过通过 BIOS 加载引导程序,并执行引导程序的全部流程。 当然,也就仅仅到引导程序就结束了。诸如操作系统之类的内容根本就没有涉及。
不过,无论是操作系统,还是用户程序,都是基于 CPU、内存等硬件而进一步抽象的上层概念。如果问没有操作系统而直接运行程序是否可行?毫无疑问,这绝对是没有问题的。
CPU 只是忠实地执行寄存器定位到的机器指令,并加以执行。特别是,如果在 理解 Linux Kernel (1) 提供的输出 "System Loading..." 的示例程序上继续加以改编,无论是算术运算、显示文本等等目的都是没有问题的。 当然,限制也还是有的,512B 是引导程序的上限。
在机器上电启动之后,存储在非易失性存储器 / 只读存储器上的 BIOS 程序将被加载到内存,并进行执行(至于细节,不甚了解,不表) 之后,BIOS 将默认地将指定磁盘(软盘、硬盘等) 首个扇区 512 字节的内容(称为 boot 引导程序)加载到内存地址,并 JMP 到 CS:IP = 0x07c00:0x0000 的位置。从而触发引导程序。
继而,如果在编写 boot 引导程序的时候,我们使其能够从外存加载额外的代码,并在引导程序结束位置将 CPU 的控制权交给这段额外加载的代码。显然,操作系统就是这样子被加载的。
BIOS -> boot 引导程序 -> 操作系统引导程序 -> 操作系统
这就构成了一个宏观的操作系统启动的一个流程。
boot.s 引导程序 主体代码来自《Linux 内核完全注释》,进行了一定量的改写
BOOTSEG = 0x07c0
SYSSEG = 0x0100
SYSLEN = 17

entry start
start:
    jmpi    go,#BOOTSEG
go:
    mov ax,cs
    mov ds,ax
    mov ss,ax
    mov sp,#0x0400

load_system:
    xor dx,dx       ! 开始位置, 磁头:硬盘号
    mov cx,#0x0002  ! 开始位置, 磁道:扇区
    mov ax,#0x0100
    mov es,ax       ! 载入到, ES 段
    xor bx,bx       ! 载入到, 偏移量
    mov ax,#0x0211  ! AH: 读取扇区子功能, AL: 读取多少个扇区
    int 0x13        ! BIOS 13 号中断
    jnc continue_load   ! JUMP if CF = 0
die:
    jmp die

continue_load:
    cli             ! 清除中断允许位标志
    mov ax,#SYSSEG
    mov ds,ax       ! 设置数据段寄存器位置 0x1000
    xor ax,ax
    mov es,ax       ! 设置扩展段寄存器 0x0000
    mov cx,#0x1000  ! 计数器
    sub si,si
    sub di,di
    rep
    movsw

    mov ax,#BOOTSEG
    mov ds,ax       ! 重新设置数据段寄存器到当前数据段基地址
    lidt idt_48     ! 设置中断描述符表寄存器
    lgdt gdt_48     ! 设置全局描述符表寄存器

    mov ax,#0x0001
    lmsw ax         ! 设置 CR0, 进入保护模式
    jmpi 0,8

gdt:
    .word   0,0,0,0
    .word   0x07FF,0x0000,0x9A00,0x00C0
    .word   0x07FF,0x0000,0x9200,0x00C0

idt_48:
    .word   0,0,0
gdt_48:
    .word   0x07FF,0x7C00+gdt,0

.org 510
    .word   0xAA55
这段汇编程序,通过 load_system 标识符标识的这段程序表明需要加载0号磁盘,0号磁头,0号磁道,从第2扇区开始,连续17个扇区的内容(这里将存储支持任务切换的程序),加载到内存以 0x1000 开始的物理地址处。
continue_load 标识将 0x1000 物理地址开始的 4096 字 (即 8192 字节) 的内容依次复制到以 0x0000 开始的物理地址处。
其后,设置 IDT (中断描述符表)、IDTR(中断描述符表寄存器) 及 GDT(全局描述符表)、GDTR(全局描述符表寄存器),将 CPU 运行模式改成 保护模式 ,继而将控制权转交给这个被加载进来的程序。
多任务程序
主体内容来自《Linux 内核完全注释》,经过一定量改变以适应当前运行环境
# head.s
.code32
LATCH = 11930
SCRN_SEL = 0x18
TSS0_SEL = 0x20
LDT0_SEL = 0x28
TSS1_SEL = 0x30
LDT1_SEL = 0x38

.text
.globl startup_32
startup_32:

    movl $0x00000010,%eax       # 段选择符 2
    mov %ax,%ds
    lss init_stack,%esp         # Load Far Pointer 加载到 SS:ESP

    call setup_idt              # 设置中断描述符表
    call setup_gdt              # 设置全局描述符表
    movl $0x00000010,%eax
    mov %ax,%ds
    mov %ax,%es
    mov %ax,%fs
    mov %ax,%gs
    lss init_stack,%esp         # Load Far Pointer 加载到 SS:ESP

# 设置 8253 定时芯片 10s 一个中断
    movb $0x36,%al
    movl $0x00000043,%edx
    outb %al,%dx
    movl $LATCH,%eax
    movl $0x40,%edx
    outb %al,%dx
    movb %ah,%al
    outb %al,%dx

    movl $0x00080000,%eax       # 重新设置 int 0x08 时钟中断
    movw $timer_interrupt,%ax
    movw $0x8E00,%dx
    movl $0x08,%ecx
    lea idt(,%ecx,8),%esi
    movl %eax,(%esi)
    movl %edx,4(%esi)
    movw $system_interrupt,%ax  # 重新设置 int 0x80 系统中断
    movw $0xef00,%dx
    movl $0x80,%ecx
    lea idt(,%ecx,8),%esi
    movl %eax,(%esi)
    movl %edx,4(%esi)

    pushfl                      # 重置 EFLAGS 嵌套任务标志位
    andl $0xffffbfff,(%esp)
    popfl
    movl $TSS0_SEL,%eax
    ltr %ax                     # Load Task Register
    movl $LDT0_SEL,%eax
    lldt %ax                    # Load Local Descriptor Register
    movl $0,current
    sti                         # set interrupt flag
    pushl $0x17
    pushl $init_stack
    pushfl
    pushl $0x0f
    pushl $task0
    iret


setup_gdt:
    lgdt lgdt_opcode
    ret
setup_idt:
    lea ignore_int,%edx         # 预先把中断处理程序的偏移地址 ignore_int 存到 EDX
    movl $0x00080000,%eax       # 预存 0x0008 - 段选择符
    movw %dx,%ax                # 补上 0-15 位偏移地址
    movw $0x8E00,%dx            # DX 补上标志位
    lea idt,%edi
    mov $256,%ecx
rp_idt: movl %eax,(%edi)        # 循环 256 遍处理 IDT
    movl %edx,4(%edi)
    addl $8,%edi
    dec %ecx
    jne rp_idt
    lidt lidt_opcode
    ret


write_char:
    push %gs
    pushl %ebx
    mov $SCRN_SEL,%ebx
    mov %bx,%gs
    movl scr_loc,%ebx
    shl $1,%ebx
    movb %al,%gs:(%ebx)
    shr $1,%ebx
    incl %ebx
    cmpl $2000,%ebx
    jb 1f
    movl $0,%ebx
1:  movl %ebx,scr_loc
    popl %ebx
    pop %gs
    ret


.align 4
ignore_int:                 # 默认的中断处理程序
    push %ds
    pushl %eax
    movl $0x10,%eax
    mov %ax,%ds
    movl $67,%eax
    call write_char
    popl %eax
    pop %ds
    iret


.align 4
timer_interrupt:            # 定时中断处理程序
    push %ds
    pushl %eax
    movl $0x10,%eax
    mov %ax,%ds
    movb $0x20,%al
    outb %al,$0x20
    movl $1,%eax
    cmpl %eax,current
    je 1f
    movl %eax,current
    jmp $TSS1_SEL, $0
    jmp 2f
1:  movl $0,current
    jmp $TSS0_SEL, $0
2:  popl %eax
    pop %ds
    iret


.align 4
system_interrupt:           # 系统调用中断处理程序
    push %ds
    pushl %edx
    pushl %ecx
    pushl %ebx
    pushl %eax
    movl $0x10,%edx
    mov %dx,%ds
    call write_char
    popl %eax
    popl %ebx
    popl %ecx
    popl %edx
    pop %ds
    iret


current:.long 0
scr_loc:.long 0

.align 4
lidt_opcode:
    .word 256*8-1
    .long idt
lgdt_opcode:
    .word (end_gdt-gdt)-1
    .long gdt

.align 8
idt:    .fill 256,8,0

gdt:    .quad 0x0000000000000000
        .quad 0x00c09a00000007ff
        .quad 0x00c09200000007ff
        .quad 0x00c0920b80000002
        .word 0x68,tss0,0xe900,0x0
        .word 0x40,ldt0,0xe200,0x0
        .word 0x68,tss1,0xe900,0x0
        .word 0x40,ldt1,0xe200,0x0
end_gdt:
        .fill 128,4,0
init_stack:
    .long init_stack
    .word 0x0010


.align 8
ldt0:   .quad 0x0000000000000000
        .quad 0x00c0fa00000003ff
        .quad 0x00c0f200000003ff

tss0:   .long 0
        .long krn_stk0, 0x10
        .long 0,0,0,0,0
        .long 0,0,0,0,0
        .long 0,0,0,0,0
        .long 0,0,0,0,0,0
        .long LDT0_SEL,0x8000000

        .fill 128,4,0
krn_stk0:


.align 8
ldt1:   .quad 0x0000000000000000
        .quad 0x00c0fa00000003ff
        .quad 0x00c0f200000003ff

tss1:   .long 0
        .long krn_stk1,0x10
        .long 0,0,0,0,0
        .long task1,0x200
        .long 0,0,0,0
        .long usr_stk1,0,0,0
        .long 0x17,0x0f,0x17,0x17,0x17,0x17
        .long LDT1_SEL,0x8000000

        .fill 128,4,0
krn_stk1:


task0:
    movl $0x17,%eax
    movw %ax,%ds
    mov $65,%al
    int $0x80
    movl $0xfff,%ecx
1:  loop 1b
    jmp task0
task1:
    mov $66,%al
    int $0x80
    movl $0xfff,%ecx
1:  loop 1b
    jmp task1

    .fill 128,4,0
usr_stk1:
上面的这个程序内容不再详述,想了解细节请参考 《Linux 内核完全注释》
下面提供编译 boot.s 以及 head.s 的可用 Makefile
首先描述一下额外的工具版本
- GNU as : GNU assembler version 2.26.1
- GNU ld : GNU ld 2.26.1 其它内容详见 理解 Linux Kernel (0)
# Makefile for the simple example kernel.
AS86    =as86 -0 -a
LD86    =ld86 -0
AS  =as
ASFLAGS =-32
LD  =ld
LDFLAGS =-s -x -M -m elf_i386 -e startup_32 -Ttext 0x0

all:    Image

Image: boot system
    dd bs=32 if=boot of=Image skip=1
    dd bs=512 if=system of=Image skip=8 seek=1
    sync

disk: Image
    dd bs=8192 if=Image of=/dev/fd0
    sync;sync;sync

head.o:
    $(AS) $(ASFLAGS) -o head.o head.s

system: head.o
    $(LD) $(LDFLAGS) head.o  -o system > System.map

boot:   boot.s
    $(AS86) -o boot.o boot.s
    $(LD86) -s -o boot boot.o

clean:
    rm -f Image System.map core boot *.o system
运行结果
想了解更多细节的请自行实操查看吧!

附件
  __                    __
 / _| __ _ _ __   __ _ / _| ___ _ __   __ _
| |_ / _` | '_ \ / _` | |_ / _ \ '_ \ / _` |
|  _| (_| | | | | (_| |  _|  __/ | | | (_| |
|_|  \__,_|_| |_|\__, |_|  \___|_| |_|\__, |
                 |___/                |___/