前一篇已经描述对文件系统进行了宏观性的描述,这一篇,将以特定的文件读写操作为示例,串联对整个文件系统的基本操作。
首先先来看看平台相关的文件读写操作的 C 代码是怎样一个调用方式
#include <stdio.h>
#include <stdlib.h>
#include <string.h>
#include <unistd.h>
#include <fcntl.h>
#include <errno.h>
#include <sys/types.h>
#include <sys/stat.h>

int panic()
{
    fprintf(stderr, "%s (errno=%d)\n", strerror(errno), errno);
    return -1;
}

int main(int argc, char *argv[])
{
    /* 打开文件 frw.txt (以可读写 | 若不存在则新建的形式) */
    int fd = open("/root/frw.txt", O_RDWR | O_CREAT);
    if (fd == -1)
        return panic();

    /* 向文件写入 Hello World! 共计 12 个字符 */
    ssize_t wsize = write(fd, "Hello World!", 12);
    if (wsize == -1)
        return panic();

    /* 重定位文件读写指针 */
    off_t off = lseek(fd, 0, SEEK_SET);
    if (off == -1)
        return panic();

    char* buf = (char *) malloc(wsize);
    /* 读取文件内容 */
    ssize_t rsize = read(fd, buf, wsize);
    if (rsize == -1)
        return panic();

    printf("%s\n", buf);
    free(buf);
    /* 关闭文件 */
    int stat = close(fd);
    if (stat == -1)
        return panic();

    return 0;
}
高速缓冲区初始化
上一篇已经描述过了,文件系统的结构、包括数据,都是持久化地存储在存储设备中的。
但是,我们应该也隐约的了解另一个事实,文件读写操作并不会直接操作存储设备上的数据,而是先经过一个称之为高速缓冲的内存区域。
那么,高速缓冲是什么? 究竟承担什么工作? 先来看看它的初始化流程吧。
首先回到 main.c (内核代码的主函数)
void main(void)
{
    ROOT_DEV = ORIG_ROOT_DEV;
    drive_info = DRIVE_INFO;
    memory_end = (1<<20) + (EXT_MEM_K<<10);
    memory_end &= 0xfffff000;
    if (memory_end > 16*1024*1024)
        memory_end = 16*1024*1024;
    if (memory_end > 12*1024*1024)
        buffer_memory_end = 4*1024*1024;
    else if (memory_end > 6*1024*1024)
        buffer_memory_end = 2*1024*1024;
    else
        buffer_memory_end = 1*1024*1024;
    main_memory_start = buffer_memory_end;
#ifdef RAMDISK
    main_memory_start += rd_init(main_memory_start, RAMDISK*1024);
#endif
    mem_init(main_memory_start,memory_end);
    trap_init();
    blk_dev_init();
    chr_dev_init();
    tty_init();
    time_init();
    sched_init();                       // 第四篇已经讲过,负责任务调度模块的初始化
    buffer_init(buffer_memory_end);     // 本篇的起始,负责缓冲区的初始化
    hd_init();
    floppy_init();
    sti();
    move_to_user_mode();
    if (!fork()) {      /* we count on this going ok */
        init();
    }
    for(;;) pause();
}
buffer_init(buffer_memory_end); 用来初始化缓冲区。此处有几个原因:
-
CPU 读写操作如果直接操作外存,速度上是一个极大的考验。毕竟内存已经较之 CPU 速度慢,外存的读写速度就更慢了。
-
解耦,其实读写操作并不仅仅发生在外存(块存储设备),同样的,字符设备等等也都会需要读写操作,增加中间层可以封装变化。
-
更多,个人了解有限...
struct buffer_head {
 char * b_data;
 unsigned long b_blocknr;
 unsigned short b_dev;
 unsigned char b_uptodate;
 unsigned char b_dirt;
 unsigned char b_count;
 unsigned char b_lock;
 struct task_struct * b_wait;
 struct buffer_head * b_prev;
 struct buffer_head * b_next;
 struct buffer_head * b_prev_free;
 struct buffer_head * b_next_free;
};

/* from fs/buffer.c */
void buffer_init(long buffer_end)
{
    struct buffer_head * h = start_buffer;
    void * b;
    int i;

    if (buffer_end == 1<<20)
        b = (void *) (640*1024);
    else
        b = (void *) buffer_end;
    while ( (b -= BLOCK_SIZE) >= ((void *) (h+1)) ) {
        h->b_dev = 0;
        h->b_dirt = 0;
        h->b_count = 0;
        h->b_lock = 0;
        h->b_uptodate = 0;
        h->b_wait = NULL;
        h->b_next = NULL;
        h->b_prev = NULL;
        h->b_data = (char *) b;
        h->b_prev_free = h-1;
        h->b_next_free = h+1;
        h++;
        NR_BUFFERS++;
        /* 跳过 640K ~ 1M 的显存和 BIOS RAM 部分 */
        if (b == (void *) 0x100000)
            b = (void *) 0xA0000;
    }
    h--;
    free_list = start_buffer;
    free_list->b_prev_free = h;
    h->b_next_free = free_list;
    for (i=0;i<NR_HASH;i++)
        hash_table[i]=NULL;
}
缓冲块的所有关键信息都由 buffer_head 数据结构进行记录, 至于有多少个 buffer_head? 只能说能划分多少就划分多少。
比较直观的结构信息如下

在 main.c 中已经提前确认了内核程序占用内存的大小,缓冲区大小以及主内存大小。
在高速缓冲区的开始位置,都用来存储 buffer_head 的信息,与每个缓冲块(从缓冲区结束位置开始分配)一一对应,直到中间某个位置不足以分配缓冲块为止。
另外的信息,就是可以看到一个 hash_table 数据结构了。
应该都能够想象,每个缓存块与外存中的数据块相对应,通过设备号 + 数据块号进行唯一定位。但是,如何快速查找需要操作的数据块是否已经存在与高速缓存中了呢? 显然直接遍历查找是不太可靠的办法。采用开放地址法的哈希表能够协助快速定位缓冲块。
挂载文件系统
既然高速缓冲区都准备就绪了,那么文件系统是否已经挂载了呢? 很遗憾,知道 main() 调用 init() 函数之前,文件系统依然没有挂载,也就是说,CPU 仍然只能通过基本输入输出对存储设备进行相当初级的 IO 操作。
那么,什么时候才能去挂载根目录呢?
/* from init/main.c */
/* 由 main() 触发 */
void init(void)
{
    int pid,i;
    /* 这是比较重要的一环了,开始挂载的起始动作 */
    setup((void *) &drive_info);
    ...
}
setup 函数做了什么呢?这是一个内嵌汇编,主要做的就是触发系统调用 int 0x80
__inline__ int setup(void * BIOS) {
    long __res;
    __asm__ volatile (
            "int $0x80"
            : "=a" (__res)
            : "0" (0),"b" ((long)(BIOS))
    );
    if (__res >= 0)
        return (int) __res;
    errno = -__res;
    return -1;
}
其中看到给出的 EAX = 0, 查表(表在 include/linux/sys.h 里) 可以知道触发的是 sys_setup 函数(函数位于 kernel/blk_drv/hd.c)
/* This may be used only once, enforced by 'static int callable' */
int sys_setup(void * BIOS)
{
    static int callable = 1;
    int i,drive;
    unsigned char cmos_disks;
    struct partition *p;
    struct buffer_head * bh;

    /* setup 只允许被调用一次 */
    if (!callable)
        return -1;
    callable = 0;
    /* 可以强制在源码中指定硬盘参数, 所以加了宏定义作判断*/
#ifndef HD_TYPE
    for (drive=0 ; drive<2 ; drive++) {
        hd_info[drive].cyl = *(unsigned short *) BIOS;
        hd_info[drive].head = *(unsigned char *) (2+BIOS);
        hd_info[drive].wpcom = *(unsigned short *) (5+BIOS);
        hd_info[drive].ctl = *(unsigned char *) (8+BIOS);
        hd_info[drive].lzone = *(unsigned short *) (12+BIOS);
        hd_info[drive].sect = *(unsigned char *) (14+BIOS);
        BIOS += 16;
    }
    if (hd_info[1].cyl)
        NR_HD=2;
    else
        NR_HD=1;
#endif
    for (i=0 ; i<NR_HD ; i++) {
        hd[i*5].start_sect = 0;
        hd[i*5].nr_sects = hd_info[i].head*
                hd_info[i].sect*hd_info[i].cyl;
    }

    /*
        We querry CMOS about hard disks : it could be that
        we have a SCSI/ESDI/etc controller that is BIOS
        compatable with ST-506, and thus showing up in our
        BIOS table, but not register compatable, and therefore
        not present in CMOS.

        Furthurmore, we will assume that our ST-506 drives
        <if any> are the primary drives in the system, and
        the ones reflected as drive 1 or 2.

        The first drive is stored in the high nibble of CMOS
        byte 0x12, the second in the low nibble.  This will be
        either a 4 bit drive type or 0xf indicating use byte 0x19
        for an 8 bit type, drive 1, 0x1a for drive 2 in CMOS.

        Needless to say, a non-zero value means we have
        an AT controller hard disk for that drive.


    */

    if ((cmos_disks = CMOS_READ(0x12)) & 0xf0)
        if (cmos_disks & 0x0f)
            NR_HD = 2;
        else
            NR_HD = 1;
    else
        NR_HD = 0;
    for (i = NR_HD ; i < 2 ; i++) {
        hd[i*5].start_sect = 0;
        hd[i*5].nr_sects = 0;
    }
    /* 更进一步设置每个盘的参数 */
    for (drive=0 ; drive<NR_HD ; drive++) {
        /* 0x300 和 0x305 分别代表两个硬盘 */
        /* 读取每个硬盘的第一块数据 (1024B) */
        if (!(bh = bread(0x300 + drive*5,0))) {
            printk("Unable to read partition table of drive %d\n\r",
                drive);
            panic("");
        }
        /* 判断硬盘有效性 */
        if (bh->b_data[510] != 0x55 || (unsigned char)
            bh->b_data[511] != 0xAA) {
            printk("Bad partition table on drive %d\n\r",drive);
            panic("");
        }
        /* 读取分区表 (位于 引导扇区第 446 字节开始处 */
        p = 0x1BE + (void *)bh->b_data;
        for (i=1;i<5;i++,p++) {
            hd[i+5*drive].start_sect = p->start_sect;
            hd[i+5*drive].nr_sects = p->nr_sects;
        }
        brelse(bh);
    }
    if (NR_HD)
        printk("Partition table%s ok.\n\r",(NR_HD>1)?"s":"");
    rd_load();              /* 尝试创建并加载虚拟盘 */
    mount_root();           /* mount 根文件系统 */
    return (0);
}
终于到了挂载文件系统的时候了
mount_root 用来做初级的初始化工作。同时,上一节已经描述过了,存储设备的超级块是用了记录整个文件系统最重要的结构。
那么通过将超级块的信息读取到内存,也就可以将内存与外存的文件系统相互联系起来了。
下面这段代码最重要的内容就是 read_super() 函数了 .
void mount_root(void)
{
int i,free;
struct super_block * p;
struct m_inode * mi;
if (32 != sizeof (struct d_inode))
panic("bad i-node size");
/* 先初始化文件表,该版本操作系统限制最大同时打开 NR_FILE(64个) 文件 */
for(i=0;i<NR_FILE;i++)
/* f_count = 0 表明没有被引用 */
file_table[i].f_count=0;
/* 如果引导盘是软盘的话,提示插入根文件系统盘 */
if (MAJOR(ROOT_DEV) == 2) {
printk("Insert root floppy and press ENTER");
wait_for_keypress();
}
/* 初始化内存超级块数据结构 (总共 8 个) */
for(p = &super_block[0] ; p < &super_block[NR_SUPER] ; p++) {
p->s_dev = 0;
p->s_lock = 0;
p->s_wait = NULL;
}
/* Hint: 读取超级块的信息,挂载根文件系统重要的部分(代码请往下翻) */
if (!(p=read_super(ROOT_DEV)))
panic("Unable to mount root");
/* 读取文件系统的 1 号i节点 (即该设备上文件系统的根节点) */
if (!(mi=iget(ROOT_DEV,ROOT_INO)))
panic("Unable to read root i-node");
mi->i_count += 3 ; /* NOTE! it is logically used 4 times, not 1 */
p->s_isup = p->s_imount = mi;
/* 应该还记得吧,current 指的是当前的任务(任务1),以后所有的任务都会由任务1或任务1的子任务进行派生,也就意味着 current->root 会一直复制过去
* 到这里为止,应该认为根文件系统以及被挂载了。是不是跟被耍了一样?
*/
current->pwd = mi;
current->root = mi;
free=0;
i=p->s_nzones;
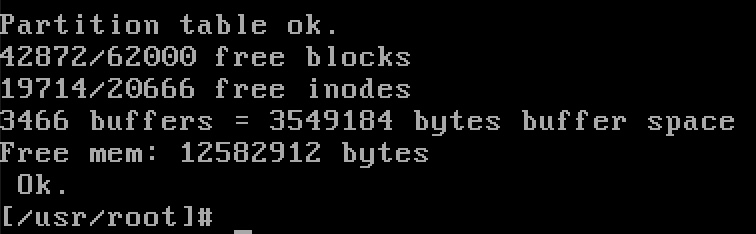
/* 统计还有多少空闲数据块以及多少可用i节点 (附上一张启动过程中打印的信息) */
while (-- i >= 0)
if (!set_bit(i&8191,p->s_zmap[i>>13]->b_data))
free++;
printk("%d/%d free blocks\n\r",free,p->s_nzones);
free=0;
i=p->s_ninodes+1;
while (-- i >= 0)
if (!set_bit(i&8191,p->s_imap[i>>13]->b_data))
free++;
printk("%d/%d free inodes\n\r",free,p->s_ninodes);
}
重要要的部分,read_super(int dev),用于读取超级块的数据
static struct super_block * read_super(int dev)
{
    struct super_block * s;
    struct buffer_head * bh;
    int i,block;

    if (!dev)
        return NULL;
    check_disk_change(dev);
    /* 如果该超级块已经在内存中了,那么就直接使用 (和这里挂载根文件系统的流程无关) */
    if (s = get_super(dev))
        return s;
    /* 设备超级块不在内存中,就先找一个空闲的内存超级块 (总共维护 8 个超级块数据结构) */
    for (s = 0+super_block ;; s++) {
        if (s >= NR_SUPER+super_block)
            return NULL;
        if (!s->s_dev)
            break;
    }
    s->s_dev = dev;
    s->s_isup = NULL;
    s->s_imount = NULL;
    s->s_time = 0;
    s->s_rd_only = 0;
    s->s_dirt = 0;
    lock_super(s);
    /* 通过 block read 读取设备第一个物理块 (每个物理块 1024 B) */
    if (!(bh = bread(dev,1))) {
        s->s_dev=0;
        free_super(s);
        return NULL;
    }
    /* 复制一份超级块的数据 */
    *((struct d_super_block *) s) =
        *((struct d_super_block *) bh->b_data);
    /* 释放缓冲区的数据 */
    brelse(bh);
    /* 验证魔数, 该版本操作系统只支持 1.0 版 Minix 文件系统,魔数 0x137F */
    if (s->s_magic != SUPER_MAGIC) {
        s->s_dev = 0;
        free_super(s);
        return NULL;
    }
    /* 先清空内存中的数据 */
    for (i=0;i<I_MAP_SLOTS;i++)
        s->s_imap[i] = NULL;
    for (i=0;i<Z_MAP_SLOTS;i++)
        s->s_zmap[i] = NULL;
    block=2;
    /* 读取 i 节点位图块 */
    for (i=0 ; i < s->s_imap_blocks ; i++)
        if (s->s_imap[i]=bread(dev,block))
            block++;
        else
            break;
    /* 读取数据块位图 */
    for (i=0 ; i < s->s_zmap_blocks ; i++)
        if (s->s_zmap[i]=bread(dev,block))
            block++;
        else
            break;
    if (block != 2+s->s_imap_blocks+s->s_zmap_blocks) {
        for(i=0;i<I_MAP_SLOTS;i++)
            brelse(s->s_imap[i]);
        for(i=0;i<Z_MAP_SLOTS;i++)
            brelse(s->s_zmap[i]);
        s->s_dev=0;
        free_super(s);
        return NULL;
    }
    s->s_imap[0]->b_data[0] |= 1;
    s->s_zmap[0]->b_data[0] |= 1;
    /* 与前面的 wait_on_super() 对应(解开lock标志) */
    free_super(s);
    return s;
}
是不是觉得也没什么,就这样根文件系统已经挂载了? 毫无实感是吧。
Extra: 普通挂载
既然讲过了根文件系统的挂载。那就顺带着讲讲普通文件系统的挂载吧。
相信从命令上来讲应该比较简单也比较熟悉吧。mount disk.img /mnt 也算是挂载到 /mnt 下了
但是,究竟是怎么实现的呢?
int sys_mount(char * dev_name, char * dir_name, int rw_flag)
{
    struct m_inode * dev_i, * dir_i;
    struct super_block * sb;
    int dev;

    /**
     * 省略大部分判断逻辑, 主要就是:
     * 1. 判断 dev_name 所属的设备号,读取该设备上的超级块
     * 2. 读取 dir_name (需要挂载到的位置),判定是否允许被挂载(比如根节点不允许挂其它设备)
     */
    ...

    /* 设置超级块的 mount 标志 */
    sb->s_imount=dir_i;
    /* 设置该 i 节点的 mount 标志 */
    dir_i->i_mount=1;
    dir_i->i_dirt=1;        /* NOTE! we don't iput(dir_i) */
    return 0;           /* we do that in umount */
}
文件读写
前面讲了这么多,终于到了最关心的部分了。当然,也并不是说前面的内容不重要,事实上,相当重要,只是都隐藏在了内核引导的过程中,且调用频度低,才导致了没有存在感。但是这恰恰才是支持文件读写的基石。
不多说废话,下面就要开始文件读写的内容。
打开文件
打开文件的函数原型是 int open(const char * filename, int flag, ...);
当然,此类系统调用最终的实现都是 int 0x80 , 明确一个调用号,然后就陷入内核态了。
内核态下调用的函数是: int sys_open(const char * filename,int flag,int mode)
来看看细节:
int sys_open(const char * filename,int flag,int mode)
{
    struct m_inode * inode;
    struct file * f;
    int i,fd;

    /*
     * current 是由内核数据段维护的当前任务的指针
     * umask 是指当前任务在新建文件时的默认掩码
     *   例如 Linux 默认是 022, 即新建文件被禁止了组用户与其它用户的写权限
     * 这里是先确定新建文件的权限
     */
    mode &= 0777 & ~current->umask;
    /*
     * 文件描述符,每个文件单独维护一套,以数字标记
     * 找一个空闲的文件描述符项
     */
    for(fd=0 ; fd<NR_OPEN ; fd++)
        if (!current->filp[fd])
            break;
    if (fd>=NR_OPEN)
        return -EINVAL;
    /*
     * 顾名思义,设置在调用 exec() 函数时主动关闭的文件
     * exec() 通常与 fork() 联用,fork() 负责复制一个任务,而 exec 负责替换新任务的代码和数据段(从而产生一个新的任务)
     * 这里的声明即是复位 fd 位置的标志,允许子任务也持有相同的文件描述符项
     */
    current->close_on_exec &= ~(1<<fd);
    f=0+file_table;
    /* 在文件表中找一项空闲的 */
    for (i=0 ; i<NR_FILE ; i++,f++)
        if (!f->f_count) break;
    if (i>=NR_FILE)
        return -EINVAL;
    /* 当前任务的文件描述符项指向文件表项, 同时文件表项的引用计数+1*/
    (current->filp[fd]=f)->f_count++;
    /* 调用 open_namei 打开文件,如果失败则释放刚才占用的文件结构,并返回错误码 */
    if ((i=open_namei(filename,flag,mode,&inode))<0) {
        current->filp[fd]=NULL;
        f->f_count=0;
        return i;
    }
    /*
     * 对不同的文件进行不同的特殊处理, 毕竟有 "一切皆文件" 的口号嘛
     * 诸如字符设备等也都是文件
     */
/* ttys are somewhat special (ttyxx major==4, tty major==5) */
    if (S_ISCHR(inode->i_mode))
        if (MAJOR(inode->i_zone[0])==4) {
            if (current->leader && current->tty<0) {
                current->tty = MINOR(inode->i_zone[0]);
                tty_table[current->tty].pgrp = current->pgrp;
            }
        } else if (MAJOR(inode->i_zone[0])==5)
            if (current->tty<0) {
                iput(inode);
                current->filp[fd]=NULL;
                f->f_count=0;
                return -EPERM;
            }
/* Likewise with block-devices: check for floppy_change */
    if (S_ISBLK(inode->i_mode))
        check_disk_change(inode->i_zone[0]);
    /* 初始化内存文件结构的各个参数 */
    f->f_mode = inode->i_mode;
    f->f_flags = flag;
    f->f_count = 1;
    f->f_inode = inode;
    f->f_pos = 0;
    return (fd);
}
在整个打开文件的过程中,除了真正去文件系统查找文件的时候用到了文件名,其它时候,都将是以文件描述符进行交互的。
再看看更细节的方面,毕竟就目前来说,我们跳过了最重要的一环 open_namei ,从而看似整个流程都简单了很多很多。
通常我们在编码过程中都是通过绝对地址/相对地址来唯一定位一个文件。因此,就必然存在逐级寻找文件的过程
static struct m_inode * get_dir(const char * pathname)
{
    char c;
    const char * thisname;
    struct m_inode * inode;
    struct buffer_head * bh;
    int namelen,inr,idev;
    struct dir_entry * de;

    /* 判定当前任务设定的根节点是否有效 */
    if (!current->root || !current->root->i_count)
        panic("No root inode");
    /* 判定当前路径i节点是否有效 */
    if (!current->pwd || !current->pwd->i_count)
        panic("No cwd inode");
    /*
     * 这里的 get_fs_byte(..) 是宏定义,fs 指的是 FS 段寄存器
     * Linux 内核将 DS, ES 用于内核数据段, 用 FS 指向局部描述符表的当前任务数据段
     * 这里可以简单理解成取字符数组的第一个字节
     */
    if ((c=get_fs_byte(pathname))=='/') {
        inode = current->root;
        pathname++;
    } else if (c)
        inode = current->pwd;
    else
        return NULL;    /* empty name is bad */
    inode->i_count++;
    while (1) {
        thisname = pathname;
        if (!S_ISDIR(inode->i_mode) || !permission(inode,MAY_EXEC)) {
            iput(inode);
            return NULL;
        }
        for(namelen=0;(c=get_fs_byte(pathname++))&&(c!='/');namelen++)
            /* nothing */ ;
        if (!c)
            return inode;
        if (!(bh = find_entry(&inode,thisname,namelen,&de))) {
            iput(inode);
            return NULL;
        }
        inr = de->inode;
        idev = inode->i_dev;
        brelse(bh);
        iput(inode);
        if (!(inode = iget(idev,inr)))
            return NULL;
    }
}

/*
 *  dir_namei()
 *
 * 处理路径 pathname, 处理成i节点表示的最终一级目录+目录下文件名(也可能pathname表示的就是目录)
 */
static struct m_inode * dir_namei(const char * pathname, int * namelen, const char ** name)
{
    char c;
    const char * basename;
    struct m_inode * dir;

    if (!(dir = get_dir(pathname)))
        return NULL;
    basename = pathname;
    while (c=get_fs_byte(pathname++))
        if (c=='/')
            basename=pathname;
    *namelen = pathname-basename-1;
    *name = basename;
    return dir;
}

/*
 *  open_namei()
 *
 * namei for open - this is in fact almost the whole open-routine.
 */
int open_namei(const char * pathname, int flag, int mode,
    struct m_inode ** res_inode)
{
    const char * basename;
    int inr,dev,namelen;
    struct m_inode * dir, *inode;
    struct buffer_head * bh;
    struct dir_entry * de;

    if ((flag & O_TRUNC) && !(flag & O_ACCMODE))
        flag |= O_WRONLY;
    mode &= 0777 & ~current->umask;
    mode |= I_REGULAR;
    if (!(dir = dir_namei(pathname,&namelen,&basename)))
        return -ENOENT;
    /* 如果给的 pathname 是一个目录 */
    if (!namelen) {         /* special case: '/usr/' etc */
        if (!(flag & (O_ACCMODE|O_CREAT|O_TRUNC))) {
            *res_inode=dir;
            return 0;
        }
        iput(dir);
        return -EISDIR;
    }
    /* 找到目录对应的i节点的数据块 */
    bh = find_entry(&dir,basename,namelen,&de);
    if (!bh) {
        if (!(flag & O_CREAT)) {
            iput(dir);
            return -ENOENT;
        }
        if (!permission(dir,MAY_WRITE)) {
            iput(dir);
            return -EACCES;
        }
        inode = new_inode(dir->i_dev);
        if (!inode) {
            iput(dir);
            return -ENOSPC;
        }
        inode->i_uid = current->euid;
        inode->i_mode = mode;
        inode->i_dirt = 1;
        bh = add_entry(dir,basename,namelen,&de);
        if (!bh) {
            inode->i_nlinks--;
            iput(inode);
            iput(dir);
            return -ENOSPC;
        }
        de->inode = inode->i_num;
        bh->b_dirt = 1;
        brelse(bh);
        iput(dir);
        *res_inode = inode;
        return 0;
    }
    inr = de->inode;
    dev = dir->i_dev;
    brelse(bh);
    iput(dir);
    if (flag & O_EXCL)
        return -EEXIST;
    if (!(inode=iget(dev,inr)))
        return -EACCES;
    if ((S_ISDIR(inode->i_mode) && (flag & O_ACCMODE)) ||
        !permission(inode,ACC_MODE(flag))) {
        iput(inode);
        return -EPERM;
    }
    inode->i_atime = CURRENT_TIME;
    if (flag & O_TRUNC)
        truncate(inode);
    *res_inode = inode;
    return 0;
}
文件写入
接下来就要进行文件写入的流程了
如何陷入内核态函数就不再细说了,相信看过这么多系统调用之后,也能知道基本上系统调用在内核态对应的函数都是以 sys_ 形式出现的
int sys_write(unsigned int fd,char * buf,int count)
{
    struct file * file;
    struct m_inode * inode;

    /* 非法 fd , 抛异常 */
    if (fd>=NR_OPEN || count <0 || !(file=current->filp[fd]))
        return -EINVAL;
    /* count = 0,无需写入数据 */
    if (!count)
        return 0;
    inode=file->f_inode;
    /* 针对不同的i节点类型,有不同的写入函数 */
    if (inode->i_pipe)
        return (file->f_mode&2)?write_pipe(inode,buf,count):-EIO;
    if (S_ISCHR(inode->i_mode))
        return rw_char(WRITE,inode->i_zone[0],buf,count,&file->f_pos);
    if (S_ISBLK(inode->i_mode))
        return block_write(inode->i_zone[0],&file->f_pos,buf,count);
    if (S_ISREG(inode->i_mode))
        return file_write(inode,file,buf,count);
    printk("(Write)inode->i_mode=%06o\n\r",inode->i_mode);
    return -EINVAL;
}
看看对于常规文件是怎么操作的吧。
int file_write(struct m_inode * inode, struct file * filp, char * buf, int count)
{
    off_t pos;      /* 偏移量 */
    int block,c;
    struct buffer_head * bh;
    char * p;
    int i=0;

    /* 如果是 Append 模式,把偏移量重置到文件末尾 */
    if (filp->f_flags & O_APPEND)
        pos = inode->i_size;
    /* 否则就使用当前文件数据结构持有的偏移量 */
    /*
        附上数据结构  file 的内容
        struct file {
            unsigned short f_mode;
            unsigned short f_flags;
            unsigned short f_count;
            struct m_inode * f_inode;
            off_t f_pos;    每个打开的文件都将持有当前的偏移值
        };
     */
    else
        pos = filp->f_pos;
    /* 逐字符向缓冲区写入数据 */
    while (i<count) {
        /* 最开始当然是创建在磁盘上占用一个数据块了 (如果文件对应的块不存在的话) */
        if (!(block = create_block(inode,pos/BLOCK_SIZE)))
            break;
        /* 根据数据块获得相应的缓冲块 */
        if (!(bh=bread(inode->i_dev,block)))
            break;
        /* 在缓冲块中的偏移量 */
        c = pos % BLOCK_SIZE;
        /* 定位到具体的缓冲区的内存地址 */
        p = c + bh->b_data;
        bh->b_dirt = 1;
        /* 当前这个缓冲块还有多少字节可写 */
        c = BLOCK_SIZE-c;
        /* 如果需要写入的数据量少于 c */
        if (c > count-i) c = count-i;
        /* 添加偏移量计数, 更新数据结构中维护的值 */
        pos += c;
        if (pos > inode->i_size) {
            inode->i_size = pos;
            inode->i_dirt = 1;
        }
        i += c;
        /* 向缓冲块逐字节写入数据 */
        while (c-->0)
            *(p++) = get_fs_byte(buf++);
        /* 释放对缓冲块的占用,当然,在释放前会完成缓冲块<->外存数据块的同步 */
        brelse(bh);
    }
    inode->i_mtime = CURRENT_TIME;
    if (!(filp->f_flags & O_APPEND)) {
        /* 非 APPEND 模式,更新文件读写指针(偏移量); APPEND 模式是使用 inode->i_size ,所有就不需要在这里更新了 */
        filp->f_pos = pos;
        inode->i_ctime = CURRENT_TIME;
    }
    return (i?i:-1);
}
是不是觉得也没有什么太高大上的操作。确实如此,更多关于缓存块与文件系统数据块的同步都已经被包装到 bread(), brelse() 中了。
不过,暂时无需细究。总之到此为止,先要有一个基础的观念: 所有与外存储器(这里也包括控制台等)进行数据交互都必须经过缓冲区
缓冲区封装了对外存储器的全部操作,而提供给 CPU 更高效的 I/O 操作,当然,也更为简单快捷
文件读取
至于文件读取,也基本类似了,所以也就不再深入描述。
当然,要注意的就是,在本篇开始的部分提供的例程中,write & read 中插入了 off_t off = lseek(fd, 0, SEEK_SET); 这样的代码。
原因应该也能够想到,学习 sys_write(..) 的时候我们已经看到,任务对同一个文件在内存中维护了一个文件读写偏移量。因此,要读取刚才写入的内容,就不得不先改动这个读写偏移量了
int sys_read(unsigned int fd,char * buf,int count)
{
    struct file * file;
    struct m_inode * inode;

    if (fd>=NR_OPEN || count<0 || !(file=current->filp[fd]))
        return -EINVAL;
    if (!count)
        return 0;
    verify_area(buf,count);
    inode = file->f_inode;
    if (inode->i_pipe)
        return (file->f_mode&1)?read_pipe(inode,buf,count):-EIO;
    if (S_ISCHR(inode->i_mode))
        return rw_char(READ,inode->i_zone[0],buf,count,&file->f_pos);
    if (S_ISBLK(inode->i_mode))
        return block_read(inode->i_zone[0],&file->f_pos,buf,count);
    if (S_ISDIR(inode->i_mode) || S_ISREG(inode->i_mode)) {
        if (count+file->f_pos > inode->i_size)
            count = inode->i_size - file->f_pos;
        if (count<=0)
            return 0;
        return file_read(inode,file,buf,count);
    }
    printk("(Read)inode->i_mode=%06o\n\r",inode->i_mode);
    return -EINVAL;
}
小结
这篇对文件系统的代码层面的描述,仅仅只是捡了一个相当有限的片面 (常规文件读写)。从文件系统的挂载开始提供了一个读写的完整流程介绍(当然,很多细节是缺失的,不过不要着急)。
虽然平常都能够了解到一个比较模糊的前提,文件读写需要利用缓冲区,但是究竟什么是缓存区,如何使用都不会有太多的概念。本篇最大的重点,就是首先请读者们建立起一个基础性的对缓冲区的了解。事实上,这个中介在 I/O 中扮演了相当重要的角色。而且内存也为其提供了相当大的一份空间,差不多有 1/4 了。
跨了差不多半个多月来写,上下文的承接可能有些生硬了,甚至不一致了... 尴尬...
  __                    __
 / _| __ _ _ __   __ _ / _| ___ _ __   __ _
| |_ / _` | '_ \ / _` | |_ / _ \ '_ \ / _` |
|  _| (_| | | | | (_| |  _|  __/ | | | (_| |
|_|  \__,_|_| |_|\__, |_|  \___|_| |_|\__, |
                 |___/                |___/